
Nylock Mod For The MK3 And MK3S
Introduction
Trying to print on the entire bed of a 3D printer can be difficult at times. From my experience with a printer that didn’t have an auto bed level probe, there was only so much space I could print on and any adjustments I made would cause another part of the bed to just go out of whack. Once thing I appreciate about the MK3S is the PINDA probe, I honestly think it’s one of the best bed leveling systems I’ve ever used, it has it’s flaws but from working with other 3D printers this has been an amazing experience. After having the printer for some time, I started realizing that parts of the bed was uneven, so uneven that I might have perfect first layers in one area but layers that were too close in others. This wasn’t noticeable on small prints, but when I made a huge print that covered the entire bed, it was obvious that the bed wasn’t 100% flat. I did some research and stumbled on what was called the “nylock mod”, and my journey to a more leveled bed began.
The nylock mod is one of the most useful mods that you can do on your MK3/S. I feel like if you’re going to do any mod on your printer this is it. The beautiful thing about the MK3/S is that it is pretty smart when it comes to making sure the bed is leveled, but that only goes so far. Sometimes you get uneven spots that the mesh bed leveling just doesn’t always catch. This is where the nylock mod shines, the bed uses 9 screws; three towards the front, three in the middle, and three in the back. This setup effectively allows us to be able to make fine adjustments to various points on the bed, with some modifications of course. As always, I'm not responsible if you somehow ruin your bed, hurt yourself, and/or break anything on your printer, modifications should be done only if you're comfortable and know what you're doing.
One thing to note is that you need to have a Raspberry Pi running OctoPi. Please refer to my guide on how to get setup: OctoPi Setup Instructions. If you aren’t already using OctoPi with your MK3/S, you should even if you don’t want to do the nylock mod. OctoPi lets you do things like print wirelessly, monitor your printer via camera, start and cancel prints remotely, and so much more. There are tons of plugins out there that are super useful.
Tools and Material
A lot of these tools and supplies you may already have, but if not I’ve added affiliate links to what I have and what I bought when I did this mod:
8x M3 nyloc nuts M3x.05mm nylock 100pk
1x M3x20mm screw M3x20mm 10pk
5.5mm socket Wera 5.5mm socket
2mm hex key Wera Precision Hex Set
3D printed tool Nylock mod tool Thingiverse Link
8x 3mm nylon washers M3 nylon washers 100pk
Raspberry Pi 3B+ running OctoPi Raspberry Pi 3B+
Process
You’ll need to disassemble the bed in order to do this mod. Essentially, what you need to do is remove all the spacers except for the one in the middle of the bed. Once you remove all the spacers you add the nylon washers and the nyloc nuts in place of the spacers. I suggest placing the spacers in a baggy and storing them somewhere in case you ever want to switch back to stock. I’ve seen manufacturers say nylon washers will withstand up to 220C while I’ve heard stories of them melting at just above 90C, I’ve never had any issues with nylon washers since I usually heat my bed up around 65C-80C. You can leave out the washer if you plan on heating your bed beyond that or use something with higher heat resistance like PTFE washers to be safe.
To start, you want to unscrew the bed from the carriage and remove all the spacers, then you want to flip the bed on it’s back. One by one you want to insert the 3mm screw back into each of the holes on the bed, this time you will use the nylon washer and nylock in place of the spacer. The easiest way to do this is to hold the screw in place with the 2mm hex key while you tighten the nylock nut against the nylon washer, just tight enough that the nylock nut is flush against the washer but the screw still can be twist freely with the hex key but not too loose that they'll rattle, washers are used to keep the nut from scratching up the bed and helps to allow the screw to move freely. Do this for all the perimeter holes, exclude the hole in the middle of the bed, we will be using the spacer for that hole. Please note that you want the nylon side of the nut to be facing the outside. Refer to my picture if you don’t quite understand what I mean.

Nylock and Nylon washer
Once all the nylock nuts have been attached to the screws you’ll want to flip the bed over. Since we still want the spacer in the middle of our bed to define that as our reference of what is perfectly leveled and at 0 variance, we’ll have to try and get it back in place. The easiest way to do this is to insert a long M3 screw into the middle hole and have it hold the spacer. I used a M3x20mm but anything long enough for you to allow you to hold the spacer in place will be fine. You want to slowly flip the bed over while holding the M3 screw and the spacer on the other side of the bed. After it has been flipped over try to wiggle the M3 screw and see if you’re able to thread it into the hole. If you’re able to thread the M3 screw, you want to screw it down a bit to hold the spacer in place while you adjust the bed and align all the perimeter screws to their holes on the carriage.


You will now want to go around and tighten each of the screws around the bed and making sure the distance be the bed and carriage is about 6mm which allows us to have a starting point that is similar to what the bed was like with spacers. I use to hold a spacer with a pair of needle nose pliers and place it real close to where each screw was then tighten each screw until the spacer was not able to move and then back up the screw a bit, but I found that this was hard to do and sometimes the spacer would fall and I ended up frantically looking for it. So I designed a super simple tool to help with this task, it’s the same height as a spacer and long enough that you can reach all the points. The other end has a hole that is just big enough for you to force a spacer in if you want to try and use an actual spacer instead. I made sure to measured the tool to make sure it was close to the same height the actual spacer was, which is 6mm. Once all perimeter screws have been tightened down, you can remove the long M3 screw and put the original one in it’s pace.


Now that the perimeter screws are tightened, you’ll want to do one last check on the middle screw and tighten that down as well. The final step in this mod is to do multiple tests and adjustments through OctoPrint until you’re happy with your bed’s variance. The OctoPrint plugin you will want is called: Prusa Level Guide, found here: Prusa Leveling Guide by Scott Rini. Before this plugin existed the way you’d figure out your variances and make adjustments was a lot more cumbersome and involved.
Running The Prusa Leveling Guide Plugin
With the Prusa Level Guide plugin installed, you will want to check a few things. I always have the “Preheat using profile” box checked, and prefer the “bed” view as opposed to the “table view”, and I like to use “degrees” from the drop down menu. After verifying these things all you do is click the “Begin Adjusting” button and the printer will start preheating and then once finished it’ll start probing all 9 points on the bed. Once this is done you’ll get some values, these tell you if the screw needs to be turned clockwise or counterclockwise and how many degrees, decimals, or fraction turns depending on what you chose from the drop down. I usually just do this by eye and make adjustments to the values that are red and orange, after a while you’ll get the hang of it and start to understand how much you should tighten or loosen a screw. Once the adjustments are made you’ll want to click the “Continue” button, this will start the probing process over again, and afterwards you can see how far off your variances are from 0 at each point. You can continually adjust, and repeat until you have a perfect variance, but I’m usually happy when my bed variance is around 0.03, if you really wanted, you could get it down to 0.02 or lower.

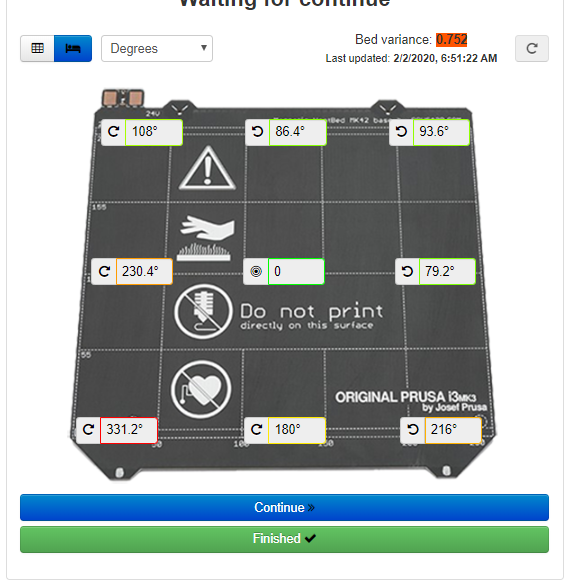

When you are satisfied with your bed variance, you can click the “Finished” button. I usually do a first layer calibration after making these adjustments and then do one of the many bed level test prints available on Thingiverse, this one being my favorite because it hits all 9 points we’ve adjusted: Bed Level Test.

Good Enough?
Conclusion
Prior to this mod I had issues with how the bottom layer looked on my print because of an uneven bed, now my first layer is pretty flawless and I haven’t had any issues using the entire bed. My prints still fail at times due to adhesion and bed variance gets off a bit but readjusting the screws is easy enough to do. I’ve also set my MK3S to do a 7x7 mesh leveling. Overall, I’m happy with this mod and highly recommend it to anyone who is experiencing issues with their own bed. If you have any questions please leave a comment below and I can try to see if I can answer it. If you found this guide helpful and would like to help me keep the site up and bring new content consider donating! My PayPal link is at the bottom of the page. Any little bit helps!
